It starts here…
Handstands are an over-complicated universe.
You are bathed in an ocean of contradicting opinions, drills and cues - leaving both beginners and experienced hobbyists a bit lost.
The solution to guide your journey is a simple shift:
Handstands are not about what you should do.
They are about what you should feel.
People will end up doing vastly different things to achieve the same outcome.
What teachers should aim at is to make you do an array of different positions, exercises, drills in the hope that a couple of them will click for you and make you feel what makes or breaks a handstand.
On your journey to a consistent, straight, two-arm handstand, don’t be hypnotised by the looks. You’re not trying to place your body exactly the same way as your fellow student or teacher.
You’re trying to perform a mechanical action.
You’re trying to feel the resulting sensation to be able to do this whenever you want, wherever you are.
This also means that you will have to change the way you train.
Handstands are not fitness

You don’t just pick a drill and maximise your reps there.
You are trying to feel something specific, remember?
This means going slowly.
Listening to your sensations.
Doing weird, sometimes counterintuitive or “wrong” stuff for the sake of feeling those sensations.
Don’t know what “warm” feels like? Take a cold shower. It will make things much clearer.
Same logic here.

What exactly are you supposed to feel?
In a nutshell, your work with the wall is supposed to get you closer and closer to the sensations you will experience freestanding.
It is therefore extremely important that you know what to look for.
→ Use the wall properly, and it will mimic “real life”, and teach you everything you need to know to balance without it.
→ Use it improperly, and it will build your stamina (yes you will be able to hold yourself longer and longer against it)… but not much else.
There are many ways to skin the cat, but at the end of the day every single drill you will perform in your first years revolve around ONE sensation: lightness.
Can you be light against the wall?
Can you be even lighter?
Can you control precisely, moving specific areas of your body in a mindful way, how heavy or light you are against it?
THIS is the game changer.
Whatever you do against the wall, it should be about getting lighter.
Because if you’re light, you will need the wall less and less.
Like a crutch you don’t really lean on anymore after months of rehab.
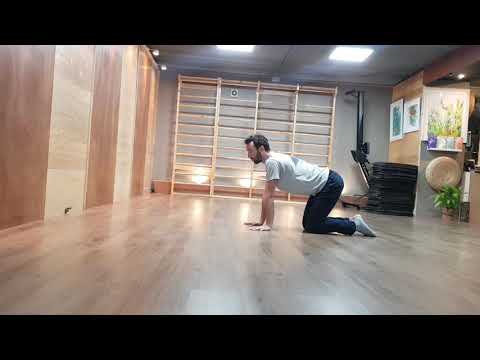
Exploration drill
1) Set yourself chest to the wall.
2) Walk your hands as close as you feel safe to the wall (don’t go so close that you’d be tempted to fall).
3) Ditch everything you think you should do.
4) No, don’t engage your core.
5) Take note of the relative heaviness or lightness of your feet against the wall.
6) Now lean your shoulder forward. Towards your fingertips. Are your feet getting lighter or heavier?
7) Go back to the starting position.
8) Do the opposite. Lean your shoulders backwards. Towards the wall, away from the fingertips. Are your feet getting lighter or heavier?
Keep this in mind.
9) Note it down.
“Performing X is making my feet lighter.”
This is your first step towards finally getting your handstands. Not the pretty instagram stuff.
The Truth about alignment: decoding
What's all the fuss with alignement?
There is no such thing as “one right alignement”.
Anyone who tells you to align such and such without explaining why is either:
- incompetent
- working within a framework that you tacitly have agreed on.
In other words,
- if you are doing gymnastics, and you need to go through the handstand position for, say, your handspring, then yes - do as you gymnastic coach tells you and stop asking questions.
- if you are learning handstands for the sake of being able to hold them, and you are told to ____________ (fill the blank, but usually to elevate or depress the scapula, engage your core, and other nuggets) without being told why, the person saying this either doesn't know what they are talking about or they don't want to overwhelm you with info (benefit of the doubt).
Alignment in handstands is just this: understanding biomechanics.
Simple.
There are two main sorts of alignements when we begin:
- one where the pelvis isn't aligned above the shoulders.
- one where the pelvis is aligned above the shoulders.
The first one doesn't look the best according to today's standards, doesn't translate well into advanced variations like shapes or presses, and may be a bit stressful on your lower back. But it ain't wrong.

The second one, well is probably the one you are after. But now you know why.

Let's zoom in. What I am about to say, I will repeat it until you dream about it. Because if you understand the following, you understand handstands.
If you don't, no matter how hard you go against that wall, you won't have it.
Ready?
To achieve a handstand, you have to align your shoulders over your hands. And then your pelvis above your shoulders.
These are what we are going to call "the two axes".
The two axes
The first axis is the vertical line you can trace between hands and shoulders.
The second axis is another vertical line you can trace between pelvis and shoulders.
The second axis is predicated on the first axis. If your shoulders start moving away from the first axis, you won't be able to stack your pelvis over your shoulders. And you are doomed.
Let's look at handsome Pedro again:

Remember this for now: No yellow line without the red line.
So, I need you to learn to establish a firm, solid first axis.
And for that, I need you to understand really deeply how it feels like.
Priming the first Axis
This feeling, we want today to replicate it in different positions.
Not only that, you want to start every single training session with the drill on all four you just did. Because you need to teach your brain again and again to remember what this feels like, till it becomes automatic.
Priming the second Axis
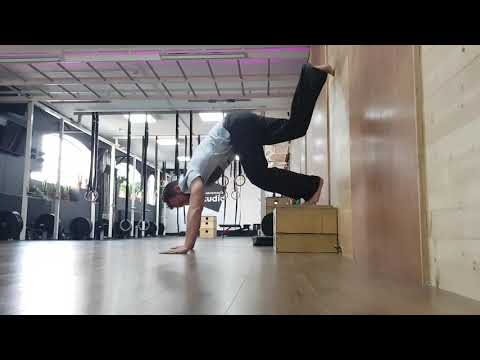
Your best bang-for-buck drill, my very dear Good Dog Bad Dog.
One of the body patterns that take the longest for beginners and improvers to feel and use is the relationship between opening the shoulders, and aligning the pelvis over the shoulders.
Opening the shoulders mean flexing the shoulders - standing up, it is what you do to bring your hands overhead.
Remember that the second axis comes AFTER the first axis.
If your shoulders are not staying over your hands (which you will know if your hands become lighter), opening the shoulders will not align the pelvis over the shoulders.
As you will see in the video, there are a couple of variations depending on where you are at.
If you are scared of being against the wall, you can perfectly do the good dog - bad dog drill on an elevated surface.
If your hands are far from the wall, it will be a bit harder to perform too - that is the unfair reality of chest to the wall practice in handstands - the more beginner you are, the harder it is.
Gradually, we will become more comfortable in holding ourselves closer to the wall, making the whole process easier (the pelvis won't have to travel as much).
Note that I do not care about you squeezing your bum or posteriorly tilting your pelvis.
Quite the opposite - if you can stick your bum out, anteriorly rotate the pelvis, for the sake of placing it better / over the shoulder line, do it.
For those of you who have shoulder mobility restriction, as a matter of fact - YOU WON'T HAVE A CHOICE.
Reminder:
- Time yourself! For all the chest 2 wall holds, your mission is to add 5 seconds every week, until you can do 60 seconds without being at the end of your life...
- Try to bring your hands 1 cm closer to the wall each week.
Using the counterweights method to understand any shape
Let's keep talking about alignement and add an important notion: Counterweights.
First, let's establish an important, untold, truth:
Handstands ≠ kicking up, finding the sweet spot and staying there with no effort.
Handstands = kicking up, falling forward, and resisting the fall
Let me reiterate that: you WANT to be falling forward. This is so counterintuitive and yet here lies the key to your progress in handstand.
More specifically, you want to be falling forward in a CONTROLLED way, so that your body doesn't crumble miserably.
Trying to adjust the perfect amount of strength in your kick up to find that elusive "floating point"... ain't gonna do sh*t for your consistency.
Now, this begs a further question:
What do we need to be falling forward. If we take the example of handsome Pedro we talked about earlier, he doesn't look like he is falling forward, right?
Let's study a shape that will change your handstand game if you haven't been exploring it just yet: the Y shape.
In a Y shape, the pelvis is over the shoulders, which are over the hands. These are the two axes we talked about.
If I draw a line between the hands and the pelvis, I should have a straight, vertical axis.
Anything PAST that axis is called OVERSHOT, or OVERBALANCE.
Anything BEFORE that axis is called UNDERSHOT, or UNDERBALANCE.
To be falling forward, you need to have something, anything, overshot. You simply need to.
Every time you fail from now on, look at the footage - you will see that in many cases, you just failed to bring a counterweight in the overshot position. Nothing was putting you there. So, you fell back to the starting position.
